Subway Surfers 1.16.0 Unlimited Coins Keys apk

Unlimited coins and keys version of Subway Surfers V1.16.0 (London)
DASH as fast as you can!
DODGE the oncoming trains!
Help Jake, Tricky & Fresh escape from the grumpy Inspector and his dog.
★ Grind trains with your cool crew!
★ Colorful and vivid HD graphics!
★ Hoverboard Surfing!
★ Paint powered jetpack!
★ Lightning fast swipe acrobatics!
★ Challenge and help your friends!
★Join the most daring chase!
★A Universal App with HD optimized graphics.
By Kiloo Games and Sybo Games
What's New
★ Celebrate the Holiday winter time in England
★ Surf the snow-covered city of London
★ Expand your limited collections with the Snowflake board and Jamie, the curious photographer
★ Earn keys every day by watching a daily Holiday Video
★ Join the Weekly Hunt and unlock the Secret Holiday Gift
REQURIED
ANDROID 2.3.3 AND UP
![[Image: AVAST2014.png]](http://3.bp.blogspot.com/-gmzjbr3knOI/UqP_U-GvlqI/AAAAAAAABrk/9WZzpVZlFgs/s1600/AVAST2014.png)
⇨ ABOUT 2014 EDITIONS ⇦
Avast! Pro Antivirus is for people and companies that want a customized computer security package. Antivirus and internet protection components in avast! Pro Antivirus are built for easy integration with existing firewalls in users' home or work computers. Pro Antivirus has two major additions to the core protection elements in avast! Free Antivirus: the Script Engine and the Sandbox.
⇨ LATEST VERSION v9.0.2008 ⇦
Fixed issues with Metro apps (after update to Win 8.1)
Fixed occassional problem with playing sounds on the VPS toasters
Fixed issue with Outpost FW warning ("unsinged" driver)
CLICK BELLOW TO DOWNLOAD AVAST INTERNET SECURITY 2014

GET AVAST 3 YEARS LICENSE KEY
.png)
and
Head on to http://www.androidpit.com/how-to-download-apk-file-from-google-play
and try out the service yourself

Now many people must be aware of the fact that whatsapp is free only for a year and after which you have to pay 0.99USD per year to use the app. This is the only limitation to this app.
But wait!! I can help you with this limitation too as this article of mine will give you various methods about how to make whatsapp free for lifetime.
![[Image: whatsapp.png]](https://lh3.googleusercontent.com/blogger_img_proxy/AEn0k_vX2QzjXY2mmGJCiftM4qk-O1OKs5BnIn0kqjiztG79Qr_4Om2MGk6G51JstDwkyptlscDedVxGhYdpe8MFk5i3RJM-WNkbXkg3n18C6Zg=s0-d)
Method 1
Requirements:
Android device.
iOS device like iPhone, iPad.( borrow from friends or elsewhere).
whatsapp installed on both the devices.
Steps:
Delete whatsapp from the android device.
Now download whatsapp on the iOS device (whatsapp should not be pre-installed in it).
Install whatsapp on iOS and verify it with your phone number on which you will receive the confirmation message. (The number should be the one which you will use in your android device).
Check whether whatsapp is working or not. You’ll receive a 10 years of free subscription.
Now remove whatsapp from that iPhone and install it in any device i.e. an android, blackberry or windows etc.
You have whatsapp lifetime subscription on your device too.
-----------------------------------------------------------------------------
Method 2
Requirements:
Android device.
Gmail installed in the android device.
Whatsapp installed in the android device.
Steps:
Once your trial period is finished, uninstall the whatsapp.
Now go to “Gmail” and create a new Gmail id.
Once you are done with it. Go to “Google play store”.
Click on the “settings” icon given on the right hand corner at the top.
Go to “account settings”.
Change the new Gmail id with the older one.
Download whatsapp once again.
Now open and sign in to whatsapp account.
You will have to apply this method after every year.
-----------------------------------------------------------------------------
Method 3
Requirements:
Android device.
Whatsapp installed in that android device.
Steps:
Open your whatsapp account.
Go to the “settings”.
Now click on the account stings.
Click on “delete my account.”
It will ask for your phone number.
Give your number there and click on “delete my account”.
You are no longer on whatsapp.
Now create a new account for whatsapp messenger as done previously.
Check the expiry date of the new whatsapp by going to “settings” after which click on “account” and then “payment info”. You’ll see that your whatsapp validity is extended.
![[Image: SC20131212_231706.png]](https://lh3.googleusercontent.com/blogger_img_proxy/AEn0k_tjCTu2vMNsKiiql_rhJTDGFZApfWjxUfhpNeW3CzANMnwIn3L_icRfYwFLlXzjbhr-6PU66VbAmgyPMdJYkAa7pqG6aE3OtKfn7EpmrgvdTVqAgZGlMqw=s0-d)
So these were the various techniques giving the answer to how to make whatsapp free for lifetime. Though these are not quite clever tricks but these are just messy methods to save a little amount of your hard earned money.
But wait!! I can help you with this limitation too as this article of mine will give you various methods about how to make whatsapp free for lifetime.
Method 1
Requirements:
Android device.
iOS device like iPhone, iPad.( borrow from friends or elsewhere).
whatsapp installed on both the devices.
Steps:
Delete whatsapp from the android device.
Now download whatsapp on the iOS device (whatsapp should not be pre-installed in it).
Install whatsapp on iOS and verify it with your phone number on which you will receive the confirmation message. (The number should be the one which you will use in your android device).
Check whether whatsapp is working or not. You’ll receive a 10 years of free subscription.
Now remove whatsapp from that iPhone and install it in any device i.e. an android, blackberry or windows etc.
You have whatsapp lifetime subscription on your device too.
-----------------------------------------------------------------------------
Method 2
Requirements:
Android device.
Gmail installed in the android device.
Whatsapp installed in the android device.
Steps:
Once your trial period is finished, uninstall the whatsapp.
Now go to “Gmail” and create a new Gmail id.
Once you are done with it. Go to “Google play store”.
Click on the “settings” icon given on the right hand corner at the top.
Go to “account settings”.
Change the new Gmail id with the older one.
Download whatsapp once again.
Now open and sign in to whatsapp account.
You will have to apply this method after every year.
-----------------------------------------------------------------------------
Method 3
Requirements:
Android device.
Whatsapp installed in that android device.
Steps:
Open your whatsapp account.
Go to the “settings”.
Now click on the account stings.
Click on “delete my account.”
It will ask for your phone number.
Give your number there and click on “delete my account”.
You are no longer on whatsapp.
Now create a new account for whatsapp messenger as done previously.
Check the expiry date of the new whatsapp by going to “settings” after which click on “account” and then “payment info”. You’ll see that your whatsapp validity is extended.
So these were the various techniques giving the answer to how to make whatsapp free for lifetime. Though these are not quite clever tricks but these are just messy methods to save a little amount of your hard earned money.
Requirements:
1. Mozilla Firefox
2. User Agent Switcher add on
3. Add On default user Setting
Steps to bypass registration on forums:
1. Use Mozilla Firefox for using this trick.
2. Now got to Tools tab in Mozilla Firefox and then select Add On.
3. Now download User Agent Switcher and Install It. Then it will ask for restarting web browser. Just restart your Firefox.
4. Now Go to Tools in Mozilla Firefox and then go to User Agent Switcher and select edit user agents.
5. Now there Enter the Information carefully:
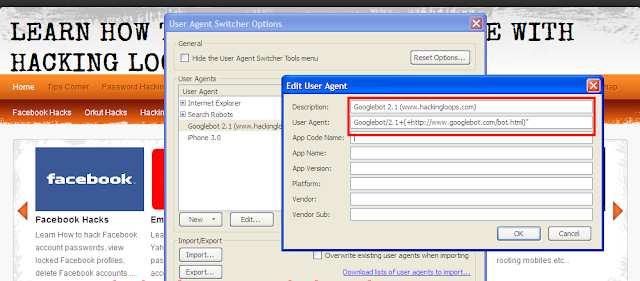
Then click on OK. Sample screenshot shown below:
6. Now close that and Again go to Tools in Firefox and then to User Agent Switcher and there select Googlebot 2.1(www.hackingloops.com).
7. You are done now. Now browse almost all forums without registration.
Drawback or Limitation:
Forums that has locked the bots from browsing their data cannot be bypassed using this hack. Also forums that uses noindex meta tag also cannot be bypassed using this trick.
1. Mozilla Firefox
2. User Agent Switcher add on
3. Add On default user Setting
Steps to bypass registration on forums:
1. Use Mozilla Firefox for using this trick.
2. Now got to Tools tab in Mozilla Firefox and then select Add On.
3. Now download User Agent Switcher and Install It. Then it will ask for restarting web browser. Just restart your Firefox.
4. Now Go to Tools in Mozilla Firefox and then go to User Agent Switcher and select edit user agents.
5. Now there Enter the Information carefully:
Description : Googlebot 2.1 (www.hackingloops.com)
User-Agent : Googlebot/2.1+(+http://www.googlebot.com/bot.html)"
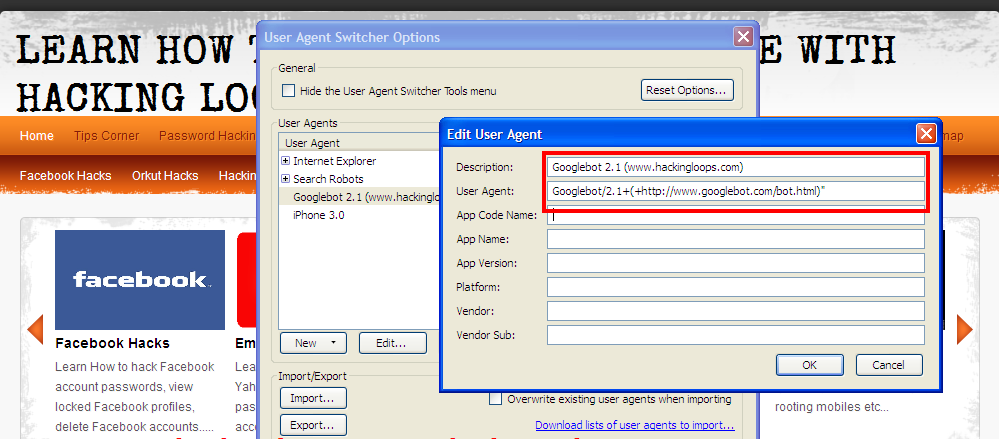
6. Now close that and Again go to Tools in Firefox and then to User Agent Switcher and there select Googlebot 2.1(www.hackingloops.com).
7. You are done now. Now browse almost all forums without registration.
Drawback or Limitation:
Forums that has locked the bots from browsing their data cannot be bypassed using this hack. Also forums that uses noindex meta tag also cannot be bypassed using this trick.
Commands in Demand provides non-technical users with easy access to
more than 150 Windows commands and features that can be hard to find or
time consuming to get to. The program includes shortcuts to terminate
non-responsive applications, restart Windows Explorer, view/clear the
clipboard, open a command prompt in a selected folder, access system
folders, view TCP/IP configuration settings, etc.
It has a selections menu (sections) according to were its commands
are related. If a command is related with more than one section and in
order to be less confused, you may find the same command buttons more
than one times.
 |
Here are some of the commands that are available in your demand:
» Applications’ Shortcuts creator to minimize apps in the SysTray
» Clipboard real-time Editing
» Color Sample Picker
» Command Prompt starter in any folder of the System
» Desktop Icons Refreshing
» Desktop Shortcuts Copy to a desirable folder
» Device Manager with Hidden Devices
» Hide / Show Desktop Icons
» Icons Extraction from files
» Images Conversion of known formats
» Internet Searching with Two Engines simultaneously
» List Alphabetizer Application
» Memory and CPU Info
» Memory Instantly Cleaning
» Non-Responding Applications Killing
» Running Processes Killing
» Safely Removal of USB Drives
» Screenshots of whatever is visible
» System Drives Quick Cleaning
» System instant General Refresh
» System’s Clock Hiding
» System’s Volume Mute
» Taskbar Hiding
» Transparency Level to the Active window
» Transparency Level to the Taskbar
» URL Shortcuts creation
» User’s and Common System Folders browsing
» Windows commonly used and hidden applications starter
» WinLogoKey shortcuts simulator
Hey Guys,Today I am going to tell you about "How to create a Autorun.inf file for USB drives or simply CD drives"
so that it can execute programs. Programs can be viruses, keyloggers,
rats or simply normal services that you want to execute automatically
whenever user open his/her pendrive or USB drive. Its the easiest way to
spread your programs to schedule, so that they can execute by itself
without any user interaction.
Creating a simple or complex autorun file for your pendrive or USB drive.
Note: You can also follow these instructions when making a CD. You just have to burn it on the cd.

When
you plug a USB or pen drive in, you might be interested in making a
program, or other things happen as soon as you plug in. The way you
accomplish this is through the Autorun.inf file. The autorun.inf file is
located in the root of the usb drive and tells Windows what to do
automatically.
This autorun can be used for good things and also for bad things depending on what you like. I am Destructive Mind, so i use it to run my coded viruses and keyloggers to execute automatically by themselves as soon as user open folder or simply opens pen drive or usb drive.
This tutorial covers:
This autorun can be used for good things and also for bad things depending on what you like. I am Destructive Mind, so i use it to run my coded viruses and keyloggers to execute automatically by themselves as soon as user open folder or simply opens pen drive or usb drive.
This tutorial covers:
- Creating a USB Autorun.inf
- Changing label\icon of thumbdrive
- Making a new option appear in the autorun menu
- Making programs automatically run when plugged in
So Read On How to create Autorun.inf file...
Creating a USB Autorun.inf :
To
create an autorun file, open Notepad and save ‘autorun.inf’’ (with
quotes) and save it to the root of the drive. All it needs to have is in
the first line;
[autorun]
[autorun]
Changing label\icon of thumbdrive:
Follow the steps in Creating a USB Autorun.inf. Before you save it, type this in in this order!
[autorun]
icon=myicon.ico
label=MyLabel
And save. Make sure the icon file is in the root of your drive.
[autorun]
icon=myicon.ico
label=MyLabel
And save. Make sure the icon file is in the root of your drive.
Making a new option appear in the autorun menu:
Right, so make your autorun file and type this into Notepad:
[autorun]
icon=default
label=[yourlabelhere]
action=programname.exe
Save it and exit. Once again, the program has to be in the root. Now, when you plug it in, the option should appear in the menu.
[autorun]
icon=default
label=[yourlabelhere]
action=programname.exe
Open Program
Save it and exit. Once again, the program has to be in the root. Now, when you plug it in, the option should appear in the menu.
Making programs automatically run when the USB is plugged in:
Follow the same instructions
[autorun]
Icon=default
label=YourLabelHere
open=programname.exe
[autorun]
Icon=default
label=YourLabelHere
open=programname.exe
And that’s it for this tutorial! Your Autorun program is ready to execute whatever you want. Here i have written to execute a simple program called programname.exe
